Follow:

    Lycra: they put that shit WHERE?!

    I picked up Rimmel’s Lycra Lash Extend mascara this weekend – yes, actually this weekend, I’m for once writing a post and not keeping it in my drafts for a week before scheduled-posting it!

    That’s right, folks. This is a current post.

    And for all of you that did a double-take on the other thing… yes, this is a mascara whose claim to fame is that it contains Lycra.

    Clearly, I had to try it, after reading a few rave reviews (duh, because I’m me). Lots of photos at the bottom of this post, so before you knock it, scroll down!
    Price: $8.99 CAD at Shopper’s Drug Mart. Maybe you can find it for less elsewhere, but the price wasn’t bad in comparison to the other “maybe”, Lash Exact, which was $9.99 for half the mascara.

    Scent: Not bad, not bad! It smelled faintly of something I couldn’t put my finger on – but it wasn’t printer toner and it wasn’t rancid food, so it’s all good.
    Actually, now that I think about it, I think it might smell a little like UDPP. But don’t quote me on that!

    Volume: Pretty good. Gave my lashes some volume, but I think it could have been better.

    Lengthening: Holy friggin’ hell! I could practically see my lashes getting longer, but I’m pretty sure I’m just crazy.
    Just kidding. I’m not crazy. This makes my lashes look so long they actually seem awkward if I’ve curled them too much beforehand – long black fibres protruding from my lid.

    Feel: Though not lovely and soft like natural lashes, this didn’t become stiff the way many do. A few lashes stuck together, but not many – just make sure you curl your outer corners well and you’ll be fine. Also, it didn’t feel heavy, like it was weighing down my lashes.

    Other: Unfortunately, this isn’t glossy, which just kills me! However, it’s a nice dark black – could probably be darker in some peoples’ opinion, but as I already have nice dark lashes, it didn’t really matter to me. It didn’t look “sooty” either – you know what I mean, when lashes look dry and greyish? None of that here, just miles of black. Lash comb handy, but not needed!

    Photos! Don’t take my word for it, see for yourself. Click to enlarge.

    Left – clean eye. I tried the mascara at night, so my favourite liner was still on but my concealer had faded a bit. I brightened all the photos up on Photoshop because the sun had set and my bulb went out, so all I had was a sad little 40 watt :(
    Right – curled lashes, no mascara.

    One coat. Lush but natural, and probably what I’ll wear most often.

    Two coats. I’d stop here because I’m afraid of Clump City! With two thorough coats, it gives almost a “false lash” effect – holding a curl well and making them look super-long. And look at those bottom lashes! They actually exist!

    Whew! Longest mascara review ever – but it’s one of the hardest (and most important!) things you’ll buy, so I like to do long ones :P

    Lengthening: 4.5/5 Fabulous – but not quite perfect.
    Volume: 4/5 Great, but I’m convinced there’s better to be found!
    Wear: 5/5 No flaking or stiffness experienced yet!
    Price: 4/5 Most drugstore mascaras are $8.99-$9.99 in Canada, but seeing as a tube of MAC mascara is $14, I still think it’s a little high.
    Overall: 4/5

    LASTLY – I’m a dork and forgot to take photos of the tube and swatch, so I’ll attach and repost another time.

    Share:

    Look, a pretty picture!

    Alima Matte eyeshadow in Lilac.

    Used in this tutorial, if you’d like to see it on! It’s a grey/purple, and though a little boring on its own, it looks gorgeous blended with something else (ie a little shimmer). As a liner, it gives a very “soft” look, with a mainly grey finish.

    Great if: you want something for the outer corner. It’s gorgeous blended, as I mentioned, and you can get sample sizes of it! (The one in the picture is just that)

    Not so great if: you want to wear it on its own – it’s a “wash-out” colour at that point, not very intense and looks a little muddy if used all over the lid on its own.

    Share:

    Fair is, well, just “fair”

    Everyday Minerals Start to Finish in Fair was pretty darn disappointing. Which is pretty major, for me, as I haven’t met an EDM product before this that I’ve disliked!

    Why it kinda pissed me off: Firstly, there are three tiny holes to get the product out of that fairly large jar. Three! It takes *forever* and once you have gotten out some powder, it sits in an awkward heap. But that’s not the worst part, not hardly.

    What I was hoping for was a sheer, smooth powder, and this didn’t deliver. The coverage seemed too heavy for a setting powder, washing me out and hiding the gorgeous shade of my blusher. And in terms of finish, it just felt like plain ‘ol mineral foundation – you know how some setting powders give that oh-so-smooth finish? This one didn’t.

    The verdict? Don’t bother with it. Sure, the price is great, but there are better ones for the price. I have some CS silica powder coming in the mail, so I’ll let you know how that goes. For now, I’m sticking with my Fyrinnae Mineral Finish in Clear – that one actually appears clear, and gives a smooth finish.

    Not as smooth as Estee Lauder’s Lucidity, but for the price, Fyrinnae has my vote for now.

    Share:

    Tell me a story.

    I’m too tired to come up with a prompt this week, so how about you just tell me things? Anything. For instance…

    • I love Safeway bagels. They’re like heaven, with a shitload of calories.
    • I’m on Team Britney and actually quite like Womanizer (shh, don’t tell my friends!)
    • I love my math teacher, though my friends that I sit with hate him and mock him all class long. He’s hilarious in a quiet, calm kind of way, plus he wears pretty dress shirts and argyle sweaters. If I was a man, I would want to be him.
    • Tight, sleek ponytails make my head hurt
    • I think I’ll get something along the lines of Restylane when I get old, but I’m afraid to tell anyone because my family frowns upon it greatly.
    • Ben of No Ordinary Rollercoaster makes my day. I think it’s currently my favourite blog, and if I was a gay guy (erm, and legal age) I’d totally do him. (Well, and if he wasn’t in a serious relationship already. And if he lived anywhere in my vicinity. Which he doesn’t.)
    • I am so excited for Amanda (Cusp of Normal) – she found out why she hasn’t been sleeping well and got engaged recently!
    • Hey, while I’m randomly listing off bloggers that I adore, I’m thrilled that FB has her perfect-esque boyfriend and that it’s going so well between them! I hope you love Dallas, hon.
    • The Canadian government is a freaking joke.

    I am going to stop now, and go eat something.

    Share:

    Everyday Minerals haul, pics only!

    Sunday Brunch blush. Do not like! This blush is pretty damn orange, and wasn’t flattering on either myself (NC15/20) or my mum (no idea, but she’s medium toned and very warm)

    The rest of mum’s samples.

    Mine! Swimming pool, for pressing, and Start to Finish as part of my powder hunt.

    First two: free samples.
    Third: sample-sized.
    Fourth: mini-sized.
    It’s nice to see that even though they use the same containers, you get the amount of product that you pay for!

    Share:

    Horror story

    TBS cream blusher (well, they call it a Cheek Blush) in Golden Pink.

    This one was hellish to get – I had a email for a full-sized tube, free, with a $10 makeup purchase.

    I wanted to get the makeup remover, because it’s listed as makeup on their site. However, when I got to the counter, the ladies told me it couldn’t be done. Well, whatever. I’ll just get concealer. Can’t have too much of that, right? But then, of course, they couldn’t figure out what the hell they were doing. So like, you buy the blush and we give you $10 off? Or like, you buy the blush for $10?? God, Canadians were like, so not supposed to get the email, but then HQ screwed up and some of you got it anyways and it just makes things so hard for me! I’ve never had to do this before!!!!

    Anyhow, it took over a bloody half hour to do – no joke, I timed it. I ended up with the blush, and a concealer that I didn’t really want.

    I was super-excited for the blush, and I opened it right when I got home. As I took off the gooey tape closing, off came about 50% of the fake metal shine on the lid, and when I squeezed it all that came out was liquid – greasy, oily, liquid. It was so old that it had completely separated; liquid and solid.

    I took the blush and concealer to another branch and told them what happened. And guess what?

    The SA was lovely! A fabulous reminder to why I love the Body Shop so much. She did a direct exchange for the blush (“Some stores have really old stock of these and they never clean them out. We had a woman come in from HQ last week to check batch codes for us, so these ones are definitely new! I tried one of these once too, and all I got was liquid – it was really gross, I know!!”) and exchanged the concealer for the makeup remover. I absolutely adored her; she was efficient and such a sweetheart. For any Edmontonians out there – the WEM Body Shop is way better than the Southgate in terms of SAs, though I find it’s busier, which can be a hassle as it is most definitely smaller as well.

    But anyhow – you want the review, not the back story!This one’s a peachy-pink, packed full with shimmer. It feels kinda like primer, very smooth and silky. However, to get an appropriate amount of product on your face you have to blend out most of the colour, or you have too much and it feels like, well, you have a layer of thick cream on your face.

    Blended, it looks like this:This is gorgeous dabbed on the apples of your cheeks for a hint of shimmer (and it is very lovely shimmer at that!) However, for a tube smaller than my thumb, $14.50 is outrageous. I do not reach for this blush and though it is nice, it is drugstore nice – and the price definitely isn’t. I’ve had it for over a month and have only used it twice, in small amounts – nice, as I said, but not fantastic.

    I’m planning on checking out this one in Heather Pink and Raspberry Pink to see if they have better payoff, but from the reviews I don’t think they will :(

    Verdict: nice texture, but it’s too expensive (especially for such a small amount!) and not pigmented enough.

    Buy if: you’re a loaded TBS-loving makeup newbie without a lot of time on your hands going for natural/pretty/radiant! :P

    Share:

    Whole lotta Smashbox

    Go get something from Smashbox STAT – FREEGIFT gets you a free Brow Tech & Cream Eyeliner Palette. And, because it’s Smashbox, shipping within the US is free and you get two free samples with every order (one is deluxe-sized)

    I may just have to get something ^^

    Share:

    The polar bear goes dancing on silver lilacs

    What is this madness? A tutorial?! With the most lame-ass name ever??? Yes! Yes it is! (The alternate titles were “Purple and silver EOTD tutorial” or “A whole eye with just three shadows”, but that’s just not as fun.)

    (Sorry to all my lidded readers… you’ll have to change this up a bit to wear it, as I have monolids!)Warning, it’s crazy pic-heavy, but it’s too late to go back now, because I don’t know how to do cuts. Each block of text refers to the photo below it.

    1. Conceal, set brows, etc. Apply a matte to semi-matte base over the entire eye area – concealer to even out skin tone, or primer to make it “stickier” and intensify pigments.
    I’m using: EDM Sandy Fair, Original Glo formula, applied wet with my adesign eye brush. (Dip brush in minerals, spritz once with water, pat on, and blend)
    Alternatives – pressed shadow: Your shade of minerals, or one half-shade to a shade lighter; MAC Ricepaper; EDM Rare Silk.
    Alternatives – bases: MAC Paint Pot in Bare Study; Urban Decay Primer Potion; Too Faced Shadow Insurance.


    2. Hilight the brow bone. (If you used primer as your base in the last step, make sure to layer a neutral shadow over it where there will not be hilight/colour – you don’t a streak of primer showing, unless you’re using one with a neutral powder finish!)
    I’m using: Lancome Crème Lustré applied dry with my adesign brush.
    Alternatives: Stila Kitten, Bobbi Brown Bone, MAC Vanilla pigment.

    3. Apply a wash of grey shadow in the fold. (Grey would work too, I guess) I would use a cream shadow for this, non-matte, but it’s up to you! Pat in with ring finger if using cream.
    I’m using: Estee Lauder cream shadow in Silver and my fingers!
    Alternatives – cream:
    Tarte’s Lock & Roll in Gunmetal; Stila Grey Smudgepot; Bourjois Shimmer Shine in Gris Platine; Benefit Skinny Jeans.
    Alternatives – powder: MAC MES Family Silver; MAC Electra; NARS Bombshell; Urban Decay Uzi, S&M, or Gunmetal.
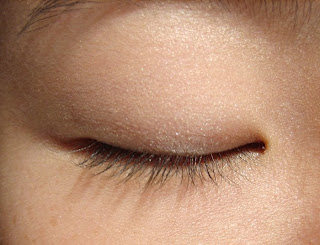

    3.5 Re-apply if it’s too light, until you get the depth that you want. I applied it only in my fold and blended up just a tiny bit, and concentrated more on the middle/outside than the inner corner.


    4. Pat on a deep, dusty, matte, plum-toned shadow onto the lid, concentrating on the outer corner. Blend in with the silver until your little fingers can’t move the brush anymore to blend. Blending should give a colour gradient as well as move a touch of shimmer into the purple area. (Because I have small eyes, the plum is much higher on the outer corner and ends with about 1/4 of my eye still to go) Layer until desired intensity is reached.
    Unfortunately, my camera wouldn’t capture the intensity of this!
    I’m using: Alima Pure Satin Matte in Lilac and my Quo all-over eye brush.
    Alternatives: EDM Casual Friday; MAC Nocturnelle; Shu Uemura M Pink 150; BE Now Liner Shadow; MAC Mauvement pigment.

    5. Line your lower lash line with a shimmer-free purple.
    I’m using: MAC Underground Violet, blended/smudged with a tightly coiled damp q-tip.
    Alternatives: Anything! Purple coordinates well with this look but honestly, use whatever floats your boat. If you have small eyes like me, though, you’ll want to put on a very smudgy low-pigment line and blend blend blend – you just want the colour, not a solid line.


    5.5 Pat on your shadow from step 4 to make it blend with the rest of the look. Blend like hell – you just want a soft shadow of colour, not an accent line.
    Using: Step 4 shadow, applied with a thin flat art brush.

    6. Use the same shadow again to line your upper lash line – dip an eyeliner brush in eyedrops, liner converter, or water, take off the crazy-excess droplets, pick up colour, and lightly tap so you won’t get fallout.
    Use: Step 4 shadow and the same ‘ol brush, but wet.


    7. Wing it!
    Use: the same shadow and tools as in step 6.


    8. Apply a gold liner to add a little “pop”. Draw your line directly above the dark line, overlapping and blending just a little. I then slid through the dark line, putting the gold underneath the dark wing, and not following to the wing tip.
    I’m using: Fyrinnae Polar Bear, with Visine and another art brush :P If you’ve never tried a soft synthetic children’s paintbrush, you must! It makes lining a dream.
    Alternatives – gold liner: Shu Uemura 05 Me Gold; NARS Glitter Pencil in Mudd Club
    Alternatives – gold shadow: EDM Oasis; MAC Rose Gold pigment; MAC Woodwinked; Fyrinnae Little Red’s Pet Wolf


    9. Lash time! Curl, apply mascara.
    I’m using: A slick of Annabelle liner, just for that lightly-mascara-ed loo
    k. Not reccomended for lashes, in my opinion, as it is too liquidy, but it was the only thing at hand!
    Alternatives: Your favourite mascara or a liner that works equally as well.
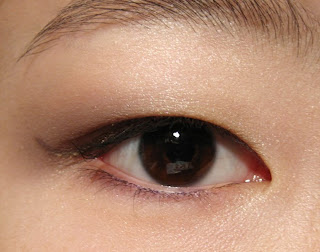

    Done!

    Overview of products used
    BASE
    EDM Original Glo foundation in Sandy Fair
    *Original Glo is great for an eye base as it has a tiny touch of shimmer/lustre to it!
    The Balm Time Balm in Lighter Than Light

    EYESHADOWS
    Alima Pure satin matte in Lilac (also used to line, wet)
    Estee Lauder cream shadow in Silver
    Fyrinnae Polar Bear (used wet to add depth to upper line and wing)

    LINERS
    Annabelle liquid liner, black
    MAC Underground Violet

    Mix up the look – other colour combinations to try applied this way
    Switch the gold liner for silver.
    Do a light base and bold liner instead of this dark base/blended liner.
    Use a dark brown instead of plum.
    Add some major colour by using an olive green or navy blue shadow, even!
    Use a matte base for a more natural look.
    Go smoky in dark grey shadow with a gold liner.
    Or try navy shadow with a silver liner!

    You have the technical bits down… now go practice your technique :P (What was that? An invitation to play with makeup? Yes, yes it was! *runs off to go do so*)

    Hope you liked :)
    Share:

    Sale post!

    Posted on Buy and Sell Beauty. For whatever reason, I tend to have a very different tone when chatting/typing on things that aren’t theNotice – more chipper, and punctuated with too many exclamation marks… I don’t know. They’re like my quills. (Strange analogy there, likening myself to a porcupine…)

    ***


    Hi all! Fairly mixed sale but no gorgeous high-end gems, sorries!

    All prices are in US$. I accept paypal (add $1 for CC) or concealed cash, because I only just got paypal myself ^^ Minimum order $10. I’m trying to build up my US paypal “fun money” so I can buy MU online! Reasonable haggling is OK with me :) Some swaps OK but I’m looking to diversify my collection up the food chain, lol! Just ask.

    I ship from CANADA so shipping will be $6. If all your items have a * by their name, shipping will be $2. If an item has a — before its name, it’s free with a $15 purchase!! (limit two)

    Last piece of buisness! I reserve the right to say no. If you’re rude and demanding, I don’t care if you have the cash – I still get to say no.

    ***


    Philosophy “Lemon Custard” lip shine, 1x with q-tip. $8
    MAC Tinted Lip Conditioner in “Plum Perfect”, to fill a 5g jar (next to t). I will take this from a clean section and melt it into the jar. (I bought it to use as a red lippie – the colour is gorgeous, an
    easy-to-wear blue-based red.) $5
    The Body Shop Cheek Blush in “Golden Pink”, BN not sealed. $10
    Natio “Peach Glow” blusher, 5x max, all hetchmarks still visible. $8 RIS from Suzie… it’s gorgeous, hon, but it doesn’t show up on me either!! :P

    Any 2 for $5
    —EDM Lip Gloss in “Pink Lemonade” RIS, about 2mm used (cleaned!)
    *Benefit BeneTint mini 5x
    Neutrogena Lip Moisturizer SPF 15 BN
    —L’Oreal True Match concealer W4-5 50%
    e.l.f. Plumping Gloss Duo “Plum Perfect” 1x clean lip brush
    Rimmel Sweet Jelly gloss BN RIS from Suzie, but I haven’t been reaching for the gloss recently! (Lip balm, lip balm, lip balm.)
    *Miss Dior Cherie sample 1x
    —e.l.f. Super Glossy Lip Shine in “Malt Shake” 1x with clean lip brush
    *Tocca “Stella” sample BN

    MAC Tendertone in “Take a Hint”, 1x with clean lip brush. $20 for the whole thing (shipping is included but will cost me $12, so it’s really only $7, lol!) or take as much as can fit in a 5g jar for $5
    —The Body Shop Born Lippy, Strawberry, 75%. Old packaging. (remelted) $3
    Beauty Rush lip gloss in “Passionfruit Pop” used on lips. $4

    Mario Badescu sample lot $2
    Strawberry Face Scrub 1x
    Azulene Calming Mask 1x
    AHA Botanical Body Soap 1x (wrinkled sticker)
    Special Cucumber Lotion (toner) one 2x, other BN.

    Estee Lauder lipstick in “Sugar Honey” – gwp? BN. $5
    Revlon Super Lustrous gloss in “Nude Lustre” 1x with separate brush. $3 (don’t buy if, like me, you’re cool toned! lol)
    *Aquolina Pink Sugar sample, BN. $2 or use as one of your 2for$5s (forgot to include earlier, lol!)
    —The Body Shop lip butter, passionfruit, old packaging but still smells great! $2


    *MAC Violet eyeliner
    used 5x but RIS, see pic for length. $5
    —*MAC melon pigment sample RIS, never used. $1
    That’s all! Email me or leave a comment with an email address (will not moderate it, you don’t have to worry about spreading your email all around the interwebs ^^) if you’re interested in anything!

    Share: