Clinique Quickliner for Eyes Intense: Intense Black, Intense Plum swatches

Friday, March 30, 2012

I believe I promised eye swatches, yes?

Here are two of the shades featured in our review — just two, because (in true Rae fashion), I accidentally took two photo sets with Intense Plum and none at all with Intense Ivy. So; the inky black and bright plum today, and we’ll leave the charcoal and green for another morning.

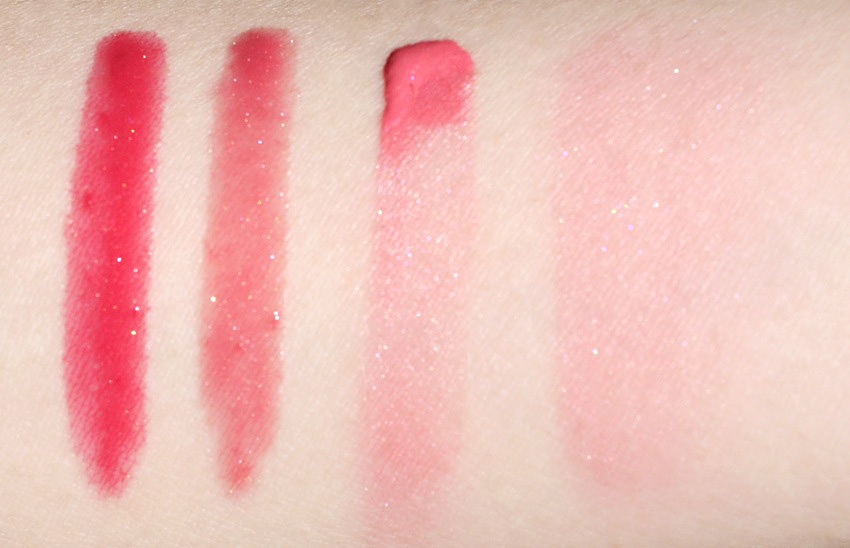
Swatched L-R: Clinique Quickliner for Eyes Intense in Intense Black, Plum, Charcoal, and Ivy.

Intense Black

The terrible thing is (well, I mean, there are lots of terrible things in the comedy of errors leading up to this post, but this one is the most relevant) that I didn’t note down any of the other products used in these photos. So don’t get too curious, because I probably won’t be able to answer your questions! ;)

I believe, for Intense Black, it’s the highlighter shade from Clarins’ Graphites quad that I’ve applied through the lid, over translucent primer. A bit of concealer under the eyes, but nothing else on the lid, and nothing on the lashes.

Clinique Intense Black lid swatch

Intense Plum

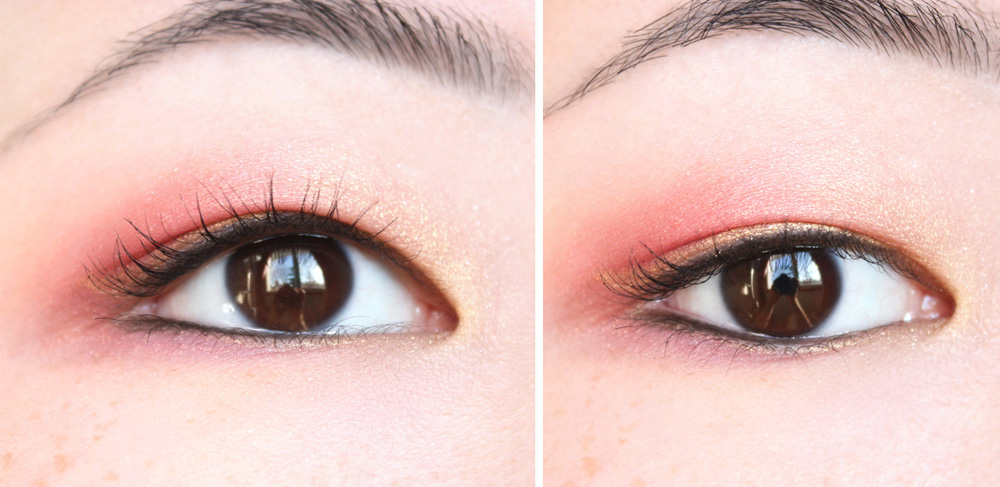
There’s an ultra-nude eye that on a pretty frequent basis, especially when testing out or photographing liners or mascaras – a look that’s very natural; almost undetectable (even on film), while still adding a bit of depth to the eye area. I’m not 100% sure, but I can say with a reasonable amount of certainty that that’s what I’ve done here. I think.

For a look like this one, it’s just a bit of (1) primer through the lid, (2) black liner pushed into (but not above or below) the lashline, and (3, 4) two eyeshadows – a subtle highlighter on the inner 2/3, plus any brown or taupe on the outer third.

If you don’t have a favourite nude eyeshadow combination, try these highlighter swatches for your lid shade & these taupe eyeshadow swatches to add depth! (I’ve been partial to using a matte medium brown, recently, but I’m afraid I haven’t enough shades in that vein to swatch them en masse… yet.)

What really “makes” the look isn’t the products, but how much of them you use and how you apply them: the difference between a regular “natural eye look” and this one is just the amount of blending. Which is to say, apply sparingly and blend the crap out of everything. 

Finish by (5) adding eyeliner, if you’d like, (6) a quick coat of mascara – always a tubing one, for me, – and (7) blending in a bit of concealer under the eyes.

Clinique Intense Plum lid swatch

More Quickliner for Eyes Intense coverage…

The quick way to get intense eyes – even on the go. | Clinique Quickliner for Eyes Intense: review, photos, swatches

Wednesday, March 28, 2012

The product: Clinique Quickliner for Eyes Intense

  ↳ in Intense Black, Intense Plum, Intense Charcoal, and Intense Ivy.

The application: Okay, so, not the easiest pencil to get on – depending on the look you’re going for. I usually wear fairly clean eyeliner, with a bit of a wing at the end, and these are a bit terrible for that! I sort of have to get it on, then grab a liner brush, and smudge it into shape.

If you’re looking for a smokey, sexy, smudgey eyeliner, though… well, look no farther. These smudge like a dream. The buttery sort of dream, which probably revolves around desserts and has a plotline worth about 1200 calories, and ends with the dreamer eating an entire cheesecake or rolling around in butter or something.

Seriously. They’re the butteriest pencil liner I’ve ever come across, which is terrible if you’re going for a precise line, but absolutely wonderful if you’re a fan of a softer, smokier line.

The wear: Unfortunately, the wear is the one thing about these liners that’s not up to par. With my oily monolids, I can get only five or six hours out of these before the colour starts to transfer – and that’s with primer and powder eyeshadow underneath. (For my lids, that’s about on par with other popular long-wearing liners, like MUFE’s Aqua Eyes, but definitely less than what I get with a good liquid liner.) If a liner can’t hold up for at least ten hours, I’ll definitely think twice before wearing it – even if the product’s this pretty!

I do have really picky lids, though, so don’t write these off without giving them a go. I have actually read very positive reviews about the wear time of these, so I guess it’s another “your mileage may vary” type of product!

Swatched L-R: Clinique Intense Black, Intense Plum, Intense Charcoal, and Intense Ivy.

Indirect sunlight, no flash.

The shades: When Clinique said “Intense,” they weren’t joking around. The Quickliner for Eyes Intense liners come in six shades, four of which are featured here – and yeah, they’re pretty damn intense. (Missing from this post are Intense Chocolate and Intense Midnight, a rich brown and a dark blue, respectively.)

Intense Black (01) is an opaque, cream-finish black with absolutely no shimmer. Intense Plum (02) is a playfully sparkly dark violet – tons of very finely milled violet and blue-violet shimmer interspersed in a creamy black base colour. Intense Charcoal (05) is a gorgeous gunmetal grey with incredibly refined silver and gold microshimmer – think “brushed metal” rather than “shimmery”. Intense Ivy (07) is a dark olive green with gold shimmer – very, very pretty.

Clinique Quickliner for Eyes Intense in Intense Black, Intense Plum, Intense Charcoal, and Intense Ivy.

The packaging: Clinique has done a surprisingly clever (not surprising because it’s Clinique; surprising because it’s so perfect) job of packaging these liners, keeping the shape and function of the Quickliner Intense range, but making them different by colouring the tubes correspondingly.

What really gets me, though, is that they’ve factored in shimmer, too: like the shades inside, the packaging of Intense Black is completely shimmer-free, while Intense Charcoal‘s tube is slightly metallic, and both Intense Plum and Intense Ivy are wrapped in shimmering colour. Talk about attention to detail!

The verdict?

They’re good, but… they’re not quite there yet. Clinique’s Quickliner for Eyes Intense formula is buttery, blendable, and (just as promised), really intense – but it doesn’t have the wear that I’d want out of a liner.

I don’t want to write it off completely, though, because I do find the formula to be quite unique. If you don’t have difficult lids, these would be the perfect way to get the look (and creaminess) of a gel liner, but with the convenience of a pencil – something that I don’t feel has been achieved by anyone yet.

Keep reading! »

Tips for beauty bloggers: Let’s talk curves.

Monday, March 26, 2012

The Photoshop kind, not the body kind. (But hey, if you want to talk humans-with-curves in the comments, you go right ahead. The world could use a little less skinny ’round here! Just keep it PG-13, you hear?)

Long story short, I’ve been working on a Clinique Quickliner Intense review, and I’m halfway done, but I’m really, really tired. So, you’ll have to wait until Tuesday for that, but this: this, you can have now.

A sad, lonely, unedited March snowfall photo.

The basics

This isn’t actually an in-depth curves tutorial; rather, I feel like I need to periodically remind people that they exist. They’re ridiculously easy (and ridiculously handy), and can be used in anything from vignetting, to increasing contrast and brightening up photos, to doing that hipster-faded thing.

Curves – brighter (think of it like a screen layer), darker (think of it like a multiply layer).

Unless you’ve gone and inverted your axes, pulling the curve upwards is going to add brightness, an S curve is going to increase contrast, and pulling the curve downwards will increase shadows. Dragging the endpoints inwards will add a more harsh change; think of it as brightening or darkening the shadows, rather than the midpoints. A curve in which the lower point is farther from the x=y line than the upper point will decrease contrast, doing that old-photograph thing that people seem to be into at the moment.

Curves – more contrast; less.

Keep reading! »

Perfection in a film clip: YSL Rouge Pur Couture Vernis à Lèvres

Sunday, March 25, 2012

Love this! Sneak behind the cut for the making of, as well – I can’t imagine spending so much time on such a meticulous task, but that’s artists for you, right? Creating brilliance where the rest of us dare not even tread ;)

Keep reading! »

24/03/12 Link Love

Saturday, March 24, 2012

Inspired by spring and St. Patty’s Day, Miss Beauty Nerd showcases her favourite green-hued products this season!

Phyrra’s Independent Spotlight for March is with Maria of Cult Nails! Learn all about Maria and how she made her dreams come true!

Love colour? This week Madame B Fatale shows you her almost neon makeup tutorial!

This Spring at theNotice is all about Clarins. (Yeah, you read that right.) Check out the one limited-edition liquid blush Rae thinks you HAVE to have this season.

The fifth and final episode to the series Eyeshadow Tutorial for Asian Eyes. This time, we discuss the Horizontal Gradient Method!

Why settle for just one blush when you can have three in one palette?! Beauty’s Bad Habit reviews Sleek ‘Pumpkin’ Blush by Three.

With Spring offically here, Beauty In The Mirror reviews Benefit Cha Cha Tint – perfect for a spring glow on the cheeks!

Think fancy, structured updo’s are too hard? Gouldylox found one that is really easy and perfect for spring weather!

It’s almost summertime, which means Shannon at Lipstick Musings is on the hunt for a great warm-weather red lipstick. She’s found one with NARS Sheer Lipstick in Manhunt!

This gold, taupe, and blue smoky eye on My Funny Valentine adds a little tribal to your weekend.

Lisamarie from Beauty Crazed discovers that not all frightening things are found in horror movies – some of them are actually as close as her face! Take a trip with her to the Vichy Skin Health Centre for a scary good time!

Check out Jenn at Spicedbeauty backstage coverage of Maybelline Beauty for Toronto Fashion Week.

Fleurissante shares her impressions on Ambre Oud, the most recent by Kilian fragrance.

Will the Hunger Games movies influence future makeup trends? Come join the discussion at Beauty Reflections!

Related Posts Plugin for WordPress, Blogger...