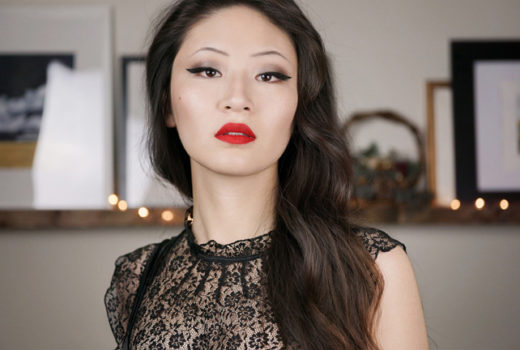


Here’s the tutorial for the Hello Kitty Wild eye — check out the final product here! If you’re just interested in finding out what I used, feel free to skip down to the bottom for a condensed “products used” list. Remember, all images can be clicked to be enlarged!
Step One
Prep the area. Conceal lid completely to disguise veins, or use a flesh-toned primer. Fill in brows. (Note: my lashes are already curled and have mascara on them. This isn’t recommended, it’s just because I did this EOTD at the end of the day… and I’m lazy!)

Try: Bare Study Paint Pot, Bare Canvas Paint, UDPP in Eden
Used: TheBalm TimeBalm, Aura Science fill powder
Step Two
Using a liner brush, “etch out” the violet area, forming a guide.

Try: any not-too-pigmented violet!
Used: Elizabeth (self-mixed, and self-named, unfortunately.)
Step Three
With a flat shader brush, fill in the violet areas. Foil the other triangle for intensity, and blend out the inner corner well (to create more sheen than colour.)

Try: MAC Grape pigment, Urban Decay Flash, MAC Satellite Dreams, MUFE Star Purple 142
Used: Annabelle Violet Vibe
Sidenote: whenever I use Annabelle pigments, I feel a bit like a drug addict. Anyone else with me on this?

Another sidenote: I somehow managed to skip step four while labelling my photos… so, for continuity’s sake, I’ll skip it in the tutorial as well. Maybe I secretly am doing more with my pigments than applying them.
Step Five
Fill in the middle “gap” with a melon, bronze, or champagne, pressing in the colour with an all-over eye brush. Then, clean the excess off the brush, and use it to buff out the edges of the violet areas.

Try: MAC Melon, Stila Kitten
Used: Melonite (again, self-mixed.)
Step Six
Line upper lashes with liquid, winging outwards. I love a dramatic-but-fairly-thin line with false lashes! For a “day look,” this would be my last step, and I’d finish with mascara and concealer.
(See that sudden change in overall image tone? Yep… that was the sun totally giving out on us.)

Try: LORAC Front of the Line PRO, MAC Penultimate
Used: Lancome Artliner (highly recommended for this look — I can’t get enough of the patent finish!)
Step Seven
Deepen the crease… if you have one. Then, with a dark plum shadow and a soft angled liner brush, create a thin veil of dark pigment on the outer 1/3 of your undereye. (This step was not on the face chart, but I added it to emphasize the lower lashes.) Do not blend this colour into the upper shadows.
When complete, use makeup remover to clean up the rest of the undereye area and conceal.

Try: MAC , Korres Plum, Tarina Tarantino Beaded
Used: MUFE 92 blended into Aura Science Black Plum
Step Eight
Add those false lashes! If desired, add mascara to blend your actual lashes into your falsies.
Try: For the top — MAC 4 lash, MAC 7 lash (a naturalish lash keeps the focus on the bottom!)
Try: For the bottom — MUFE 130 Jennifer, MUFE 23 Renee, Illamasqua 017 (try to pick something full, but with longer pieces, then trim to fit.)
Used: Unnamed lashes on the bottom, Revlon Defining lashes on the top. (The latter lashes have been trimmed quite a bit, though!) Duo lash adhesive, clear.
Products used:
TheBalm Time Balm, Lighter Than Light
Aura Science brow fill powder
Duo lash adhesive / Revlon Defining lashes / Unnamed false lashesLancome Artliner
Elizabeth and Melonite home-pressed pigments
Aura Science Black Plum shadow / MUFE 92 shadow
Annabelle Violet Vibe