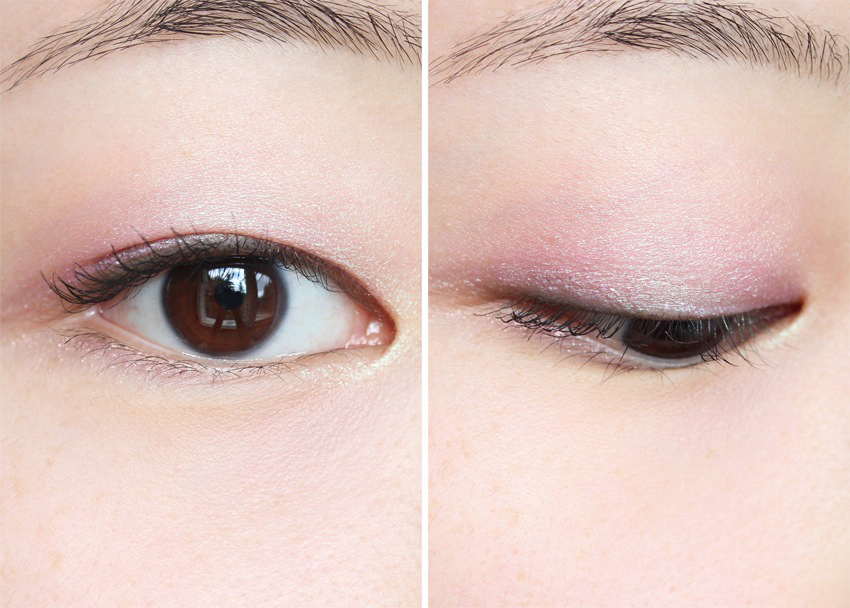
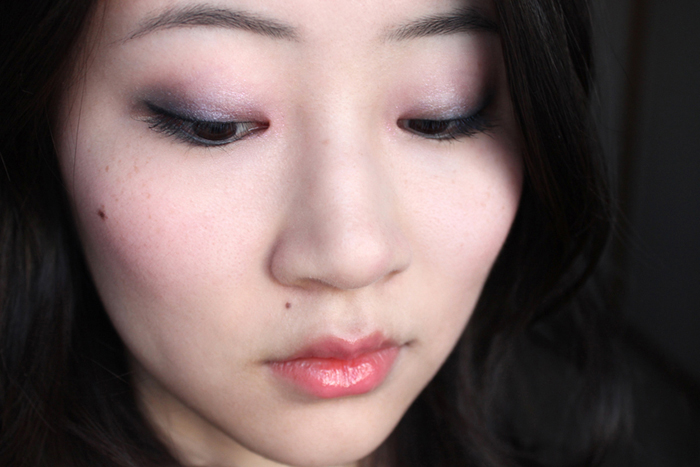
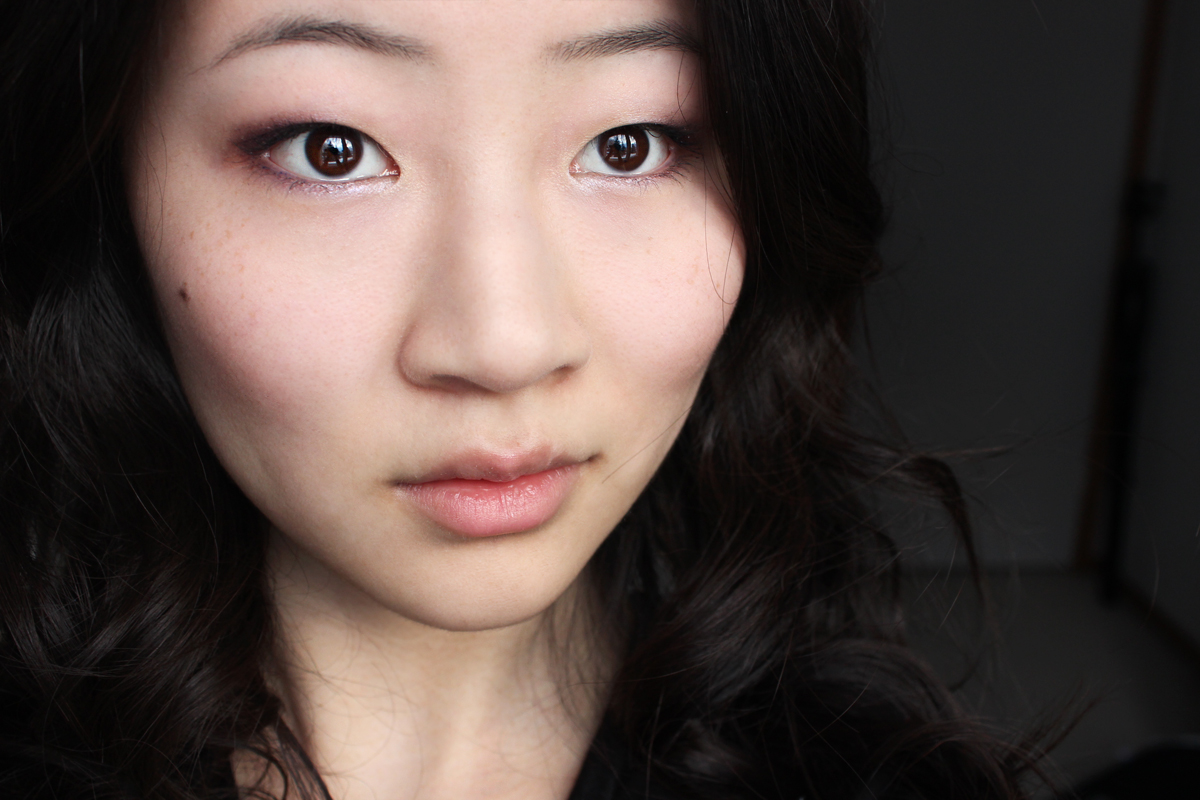
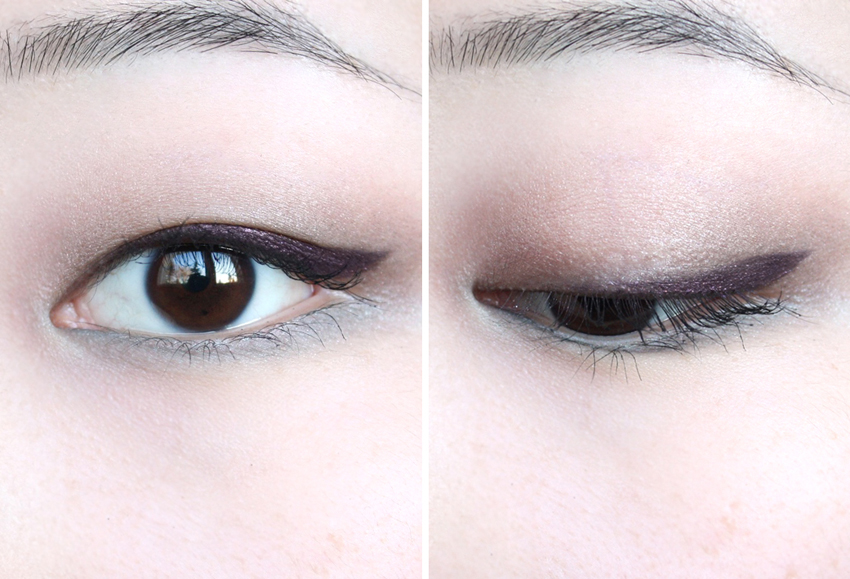
Playing with textures | A violet-eyed makeup look done entirely with cream products

Monday, January 21, 2013

Easy cream eyeshadow tutorial

I love playing with different textures when it comes to my makeup, but it’s not a regular thing for me — I have a set few products that I use all the time (mainly powders), and I don’t really get much of a chance to work with other methods of delivery.

My sister, though, is hugely into creme products. Like, hugely-hugely. She has this weird–and notably false–preconception that the pigments in cream products will stick around for longer, but it means that her stash is easily 80% cremes.

Illamasqua Zygomatic Cream Blusher

Anyhow. For something a little different, I borrowed a couple of her favourite creme products (the Estée Lauder  cream eyeshadow and Illamasqua blusher) and threw together a violet-eyed, neutral-cheeked look.

For the full tutorial, don’t miss this post on She Said Beauty! 

!Violet and brown eyeshadow tutorial (s)

The eyes

For the eye, I started with a base of Estée Lauder Ivory Lace (the ShadowCremes are being discontinued; try something like MAC Bare Study instead), added Ellis Faas Light in E304 to the outer half of the lid, then layered Clinique Lid Smoothie in Born Freesia overtop in the centre. And it… went actually horribly, to be honest.

I’ve never tried to layer one of the Lights before; I will never try to layer one of the Lights ever again. 

(Actually, now that I think about it, I’m pretty sure I’ve come to this conclusion before. Anyone else find that Ellis products are glorious only if used without a primer underneath?)

!Winter violet lids (s)

I don’t know if it was the layering or the blending, but — never; never again. Fingers or brushes didn’t matter; drying time didn’t matter… again and again, I ended up with flaky bits of fallout and an increasing amount of eye irritation.

To get around this, I actually mixed the two violets on the back of my hand & applied. It went really well, surprisingly — E304 added an intensity that Born Freesia doesn’t usually have, but the texture of the Lid Smoothie was maintained and led to a really easy, smooth application.

The escapades continue »

The Lipstick Bandits’ Secret Santa Look Swap | Big hair & a plush pout, inspired by call it beauty.

Monday, December 24, 2012

!LB look swap - call it beauty

Happy Christmas-Eve-Day, my dearlings!

This month for The Lipstick Bandits, we’ve put together something a little different — a bit of a “secret santa” project, for both ourselves and our readers. Each Bandit has been paired up (by myself, unbeknownst to the other person) to create a look inspired by the other blogger, whether in product, application, colour… you get the idea.

The inspiration: Dani, at call it beauty. 

Dani - call it beauty

I ended up being paired with the absolutely gorgeous Dani, a wonderfully talented Vancouverite with a fantastic blog (and even more fantastic hair.) To mimic her look, I tried to copy said hair (of course), using hot rollers and a flat iron to add as much curl and volume as possible.

I think the hair went surprisingly alright, all things considered, but I’m completely bummed that I forgot to line my waterlines in black, as she usually does!

!LB look swap - Dani

After making my best attempt at getting Dani-hair, I applied a quick flick of coloured eyeliner (Shu Uemura Blackish Satin Purple) overtop a neutral smokey eye (mainly Clarins Smokey Passion, used also here and here), and paired with a pop of colour — in this case, a bright teal along the lower lashline.

Finally, I applied a sheer layer of a coral-y blush, and layered a Marcelle Rouge Vitality lipstick (one of my all-time favourite formulas) with Korres‘ Cherry Oil Lipgloss in Rose for a bright, plush pout, something I absolutely associate with Dani’s look.

! The Lipstick Bandits Secret Santa Look Swap

I also made sure to take the eye shots from my left eye, rather than my right — I feel like I never see Dani’s right eye unless it’s in a full-face shot! :P

My right eye is certainly my favourite, but I have to admit, it was kinda nice to change things up a little & photograph the other one for once.

!The Lipstick Bandits December Look Swap

Keep reading! »

A soft twist on holiday winged liner (in burgundy, brown, and gold)

Thursday, December 20, 2012

Burgundy winged liner tutorial (s)

Holiday looks tend to be pretty standard–opaque red lips, black winged liner, probably some shimmer,–but here’s something you might not have tried before.

With soft burgundy winged liner and a warm/neutral smokey eye, it’s a little less LOOK MOM, CHRISTMAS! and a little more this-non-denominational-holiday-party-is-too-hipster-for-you.

Then again, that’s not necessarily a good thing. Either way; I hope you’re having a wonderful holiday season so far, whether that means massive extended-family-and-friends celebrations or just a few wonderful days without work! (Or neither, but hopefully it will still involve cookies.)

Holiday makeup look coloured liner (s)

A step-by-step tutorial to get the burgundy winged liner (with eyeshadow!) 

Conceal and prime, then use an all over eye or blending brush to create a sheer, warm-neutral smokey eye. (This is the Clarins Odyssey palette that reviewed on theNotice last week — it’s a great pick for a palette that “feels” warm without actually being too warm.)

Step by step burgundy winged liner tutorial

Add a bit of shimmer to the middle of the lid to keep it from looking too drab (I love Clarins quads for this), and finish by taking a burgundy or wine-coloured eyeshadow along the upper lashline & into a wing. For an eyeliner flick with a bit more intensity and better wear, use a stiff angled eyeliner brush moistened with a bit of water or setting spray to apply the line.

From there, just polish up the look with defined brows and plenty of mascara!

Winged burgundy eyeliner - winter holiday look

Products used & a ramble about the Shu curler »

How to say “Holidays” in plum & peach | The festive face of the Karl for Shu Prestigious Bordeaux palette

Monday, December 3, 2012

Somewhere in the cross-cultural translation between “holiday kitsch” and “makeup,” the reds and greens of the Holiday season ended up being translated into… well, plums and peaches, in the case of the Karl Lagerfeld for shu uemura Prestigious Bordeaux palette. 

Between moody-but-colourful smokey eyes and a bright, plush lip, though, the Prestigious Bordeaux palette still manages to carry off the Holiday vibe. Paired with defined brows, heavy lashes, and a seriously sculpted cheek, I think this look would still fit in well at a quiet winter soirée or after-hours office party — it easily creates a festive look, but one that’s a little less glaringly Christmas.

Read the full tutorial here on She Said Beauty, & don’t miss this Prestigious Bordeaux review on theNotice!

Keep reading! »

A last-minute Halloween idea: Star-studded beauty

Wednesday, October 31, 2012

I’ll be the first to admit that I’m awful at planning things in advance, as you might have noticed. (Full disclosure; I managed to schedule tomorrow’s review for this morning. It was up for a little over three hours, so if any of you are wondering where it went — well, went to go hide behind Nov. 1st for the meantime.)

So, here’s one for all of you who want a cool, wearable Halloween look that requires almost no planning. Because, let’s be honest, sometimes planning is just one of those things that should (but totally never manages to) happen.

For a full tutorial, don’t miss this post on She Said Beauty! 

Not just easy to co-ordinate, this look is pretty easy to assemble, too. Start out with a basic face; medium-coverage foundation; plenty of powder and contouring. The lip and cheek colours are up to you (I love a good reddish lip in the fall), as is the brow shape — just make sure to fill them; with a focal point away from your eyes, you’ll want to make sure they’re still adequately framed.

If you’re adding illuminator to your cheekbones, try to pick a powder product to get better wear out of the stars.

Start your eyes with a basic, matte smokey eye, then add a little bit of interest for Halloween’s sake. I went with a metallic gold, lining my upper lashline with LUSH Fantasy & taking Fyrinnae Polar Bear through the inner corners. Then, after mascara, I took Fantasy along a few of the tips of my upper lashes, too. (You can see it more in the flash photo, later in this post.)

Another option that’s just as easy is to sparkle with pointed intent — pick a loose pigment with a larger particle size of shimmer, then pat it onto the middle of your lids and/or the inner corners. Don’t blend it too well, leaving it instead to juxtapose with the matte lid shades, and choose something with coloured reflects (eg. red at an angle or with flash, but unnoticeable straight-on) for extra impact.

From there, grab some lash glue & craft store confetti to take the look from pretty to Halloween-levels-of-awesome. I kind of cheated on both, to be honest; instead of lash glue, I used an Annabelle Glitterama Liquid Eyeliner (glitter liners are my stash secret for when I’m out of proper fixatives) & picked the gold and silver stars out of a rainbow mix of loose stars.

What? It’s not poor planning; it’s totally innovation.

Keep reading! »

Related Posts Plugin for WordPress, Blogger...